Simple AWS EC2 instance scheduler
More than two years ago, I wrote a “how-to” post about the Amazon AWS Instance Scheduler that was based on the pieces provided by the AWS team. I notice that in many cases, my clients and my readers need a really simple solution, not that complicated as the one proposed by Amazon. Of course, the AWS scheduler is very flexible and configurable, but also requires some trial and error for complicated installations and a lot of steps for really easy ones. It can be handled in a simpler way.
I decided to write my own, really simple scheduler, based on AWS Lambda. It requires no database, the whole configuration is handled in the script itself and by the tags on the EC2 instances.
The scheduler will require the following elements to be configured:
- IAM Policy to allow the script to interact with EC2 instances
- IAM Role which will contain the policy and will be attached to the Lambda function
- The Lambda function that will take care of checking instances and starting/stopping them
- Configuration of EC2 instances to set a proper tag on them
- CloudWatch trigger, that will execute Lambda function periodically
Let’s build this piece by piece.
Prepare IAM policy
In order for the script to interact with EC2 instances, we have to allow the Lambda function to perform such tasks. We have to prepare a security policy and security role. The policy will be attached to the role, the role will be attached to the Lambda function.
Policies are managed in AWS IAM, so you have to log in to your console, switch to IAM, and select Policies from the left menu. On the page that appears, click “Create Policy”.
Now you can switch to the JSON editor and paste the policy contents provided below the screenshot:
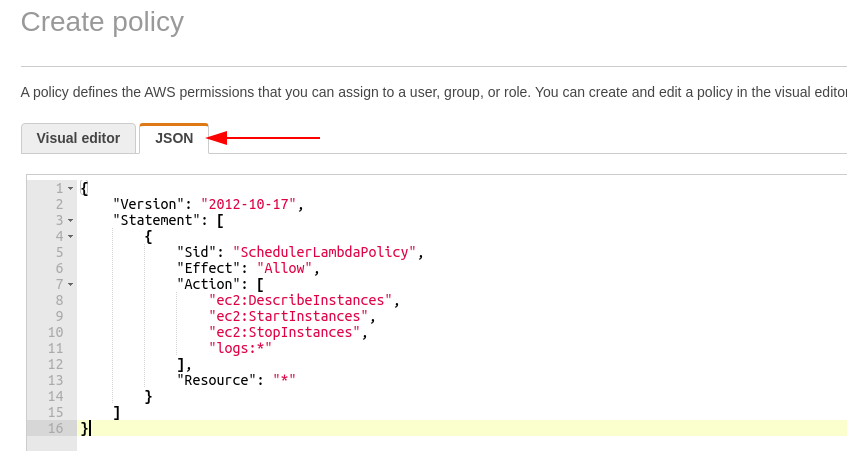
Here are the contents of the policy:
{
    "Version": "2012-10-17",
    "Statement": [
        {
            "Sid": "SchedulerLambdaPolicy",
            "Effect": "Allow",
            "Action": [
                "ec2:DescribeInstances",
                "ec2:StartInstances",
                "ec2:StopInstances",
                "logs:*"
            ],
            "Resource": "*"
        }
    ]
}
Click Review Policy – you should now set the name of the policy, let’s say: scheduler_policy – we will use it during the role creation.

Prepare IAM role for the Lambda function
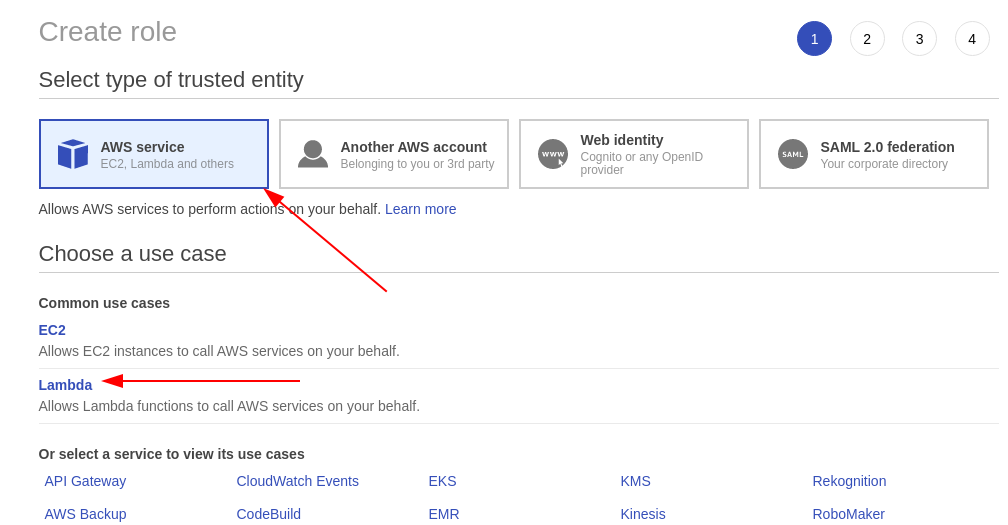
Now we will prepare the role. In IAM click on Roles in the left menu and click “Create Role” button. Click the AWS service box on top of the page and select Lambda below. Once highlighted, click “Next: Permissions” at the bottom of the page.
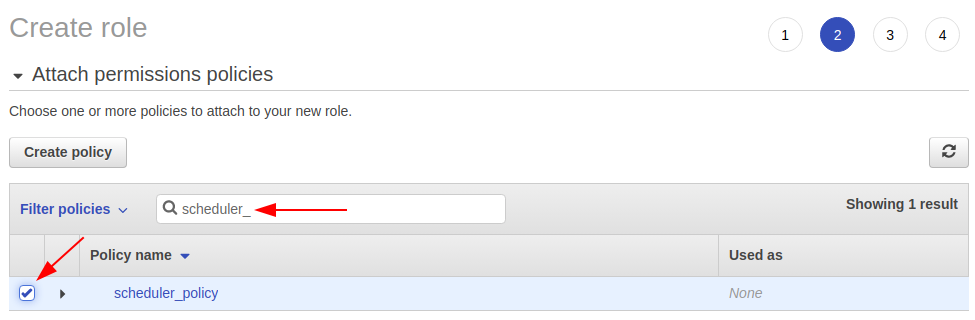
You can filter the list of policies to narrow it to the “scheduler_policy” we created in the previous step. Click the checkbox next to the scheduler_policy on the list and click “Next: Tags” at the bottom of the page.
You don’t have to define any tags on the role. Click “Next: Review” and set the role name. Let’s name it scheduler_role. As the last step here click “Create Role” and your new role is now ready.
Create the Lambda function
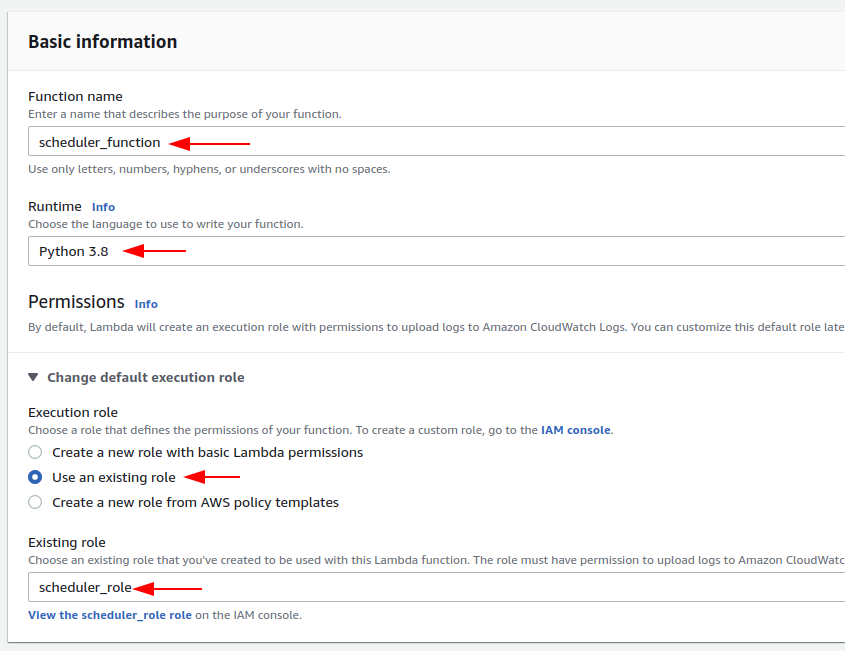
Now, let’s switch to the Lambda. Click on the Services menu on top of the page, select Lambda. On the Dashboard, you will see the “Create Function” button. Let’s click it. Select “Author from scratch” and fill the Basic Information as follows:
Function name: scheduler_function
Runtime: Python 3.8
Chose or create execution role: Use existing role
search for the scheduler_role and select this one
Now you can click “Create Function” at the bottom of the page. You will be presented with the function dashboard. Let’s focus on the code editor. There is already “lambda_function.py” opened in the editor, we will replace it’s contents with the following code:
import json
import boto3
from datetime import datetime
#
# configuration
#
#
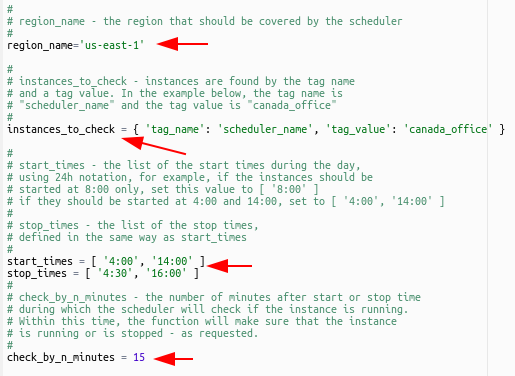
# region_name - the region that should be covered by the scheduler
#
region_name='us-east-1'
#
# instances_to_check - instances are found by the tag name
# and a tag value. In the example below, the tag name is
# "scheduler_name" and the tag value is "canada_office"
#
instances_to_check = { 'tag_name': 'scheduler_name', 'tag_value': 'canada_office' }
#
# start_times - the list of the start times during the day,
# using 24h notation, for example, if the instances should be
# started at 8:00 only, set this value to [ '8:00' ]
# if they should be started at 4:00 and 14:00, set to [ '4:00', '14:00' ]
#
# stop_times - the list of the stop times,
# defined in the same way as start_times
#
start_times = [ '4:00', '14:00' ]
stop_times = [ '4:30', '16:00' ]
#
# check_by_n_minutes - the number of minutes after start or stop time
# during which the scheduler will check if the instance is running.
# Within this time, the function will make sure that the instance
# is running or is stopped - as requested.
#
check_by_n_minutes = 15
#
# no changes required past this line
#
def lambda_handler(event, context):
print('Scheduler started')
print('Current time is: {}'.format(datetime.now().strftime('%H:%M')) )
#
# Checking if the instances should be started or stopped
#
action_to_take = 'no action'
current_time = datetime.now().hour * 100 + datetime.now().minute
for start_time in start_times:
num_time = int(start_time.replace(':',''))
if (current_time >= num_time) & (current_time <= (num_time + check_by_n_minutes)):
action_to_take = 'start'
for stop_time in stop_times:
num_time = int(stop_time.replace(':',''))
if (current_time >= num_time) & (current_time <= (num_time + check_by_n_minutes)):
action_to_take = 'stop'
print('Action to take: {}'.format(action_to_take))
if action_to_take != 'no action':
#
# Looking for the instances to check
#
ec2 = boto3.resource('ec2', region_name=region_name)
ec2_client = boto3.client('ec2', region_name=region_name)
custom_filter = [
{'Name':'tag:' + instances_to_check['tag_name'],
'Values': [ instances_to_check['tag_value'] ] }
]
instances = ec2.instances.filter(Filters=custom_filter)
print('----- Instances to check: -----')
for instance in instances:
print('Checking {}...'.format(instance.id))
if (instance.state['Name'] == 'running') & (action_to_take == 'stop'):
print('Instance {} in the state "{}" should be stopped'.format(instance.id, instance.state['Name']))
ec2_client.stop_instances(InstanceIds=[ instance.id ], DryRun=False)
if (instance.state['Name'] == 'stopped') & (action_to_take == 'start'):
print('Instance {} in the state "{}" should be started'.format(instance.id, instance.state['Name']))
ec2_client.start_instances(InstanceIds=[ instance.id ], DryRun=False)
print('Scheduler finished')
return {
'statusCode': 200,
'body': json.dumps('Scheduler executed')
}
Configuration
As the configuration of the Lambda function, you should fill the values on top of the script. They are described in the code. You should review the following variables:
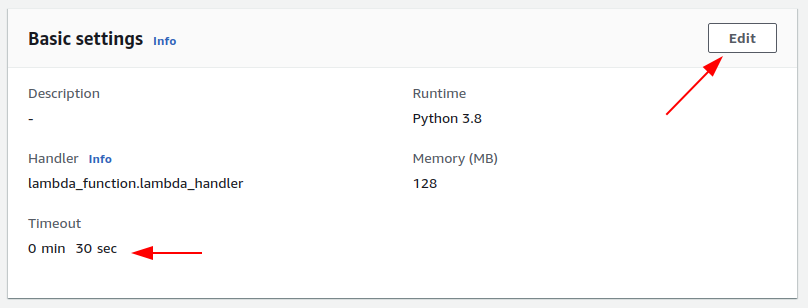
Once you will configure these variables, click the “Deploy” button on top of the editor area. This will prepare the function to be executed. Below the editor, you will find the Basic settings, set the Timeout to at least 30 seconds.
EC2 configuration
Before we will be able to test the function, we have to configure the tags on the EC2 instances that should be affected by the scheduler. Go to EC2, select the instance you want to use with the scheduler, and set the proper tag. This should be the tag and tag value you selected in your Lambda configuration.
Test configuration
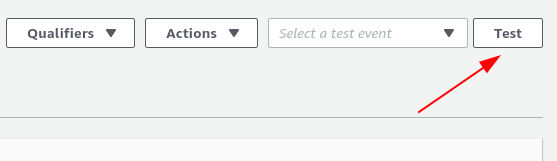
Now we can go back to Lambda function we just created and test it. On top of the Lambda function page, there is a Test button.
Because there is no test defined for your new function, the new test will be created. Fill the form with your Event Name (for example: test) and fill the event editor with {} as below (empty JSON):
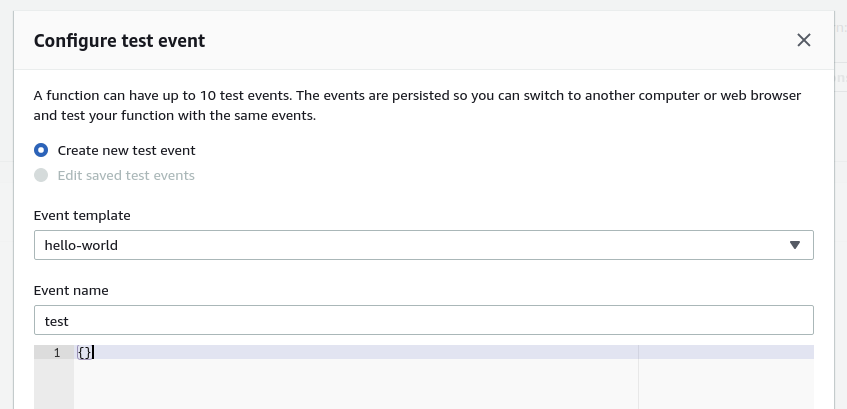
Now you can click “Create Test” at the bottom. Your test is ready. You can now select your test from the dropdown and click Test again:

After the test, you will be presented with the test results. On my example you can see that there is no action to take (instance is already running):
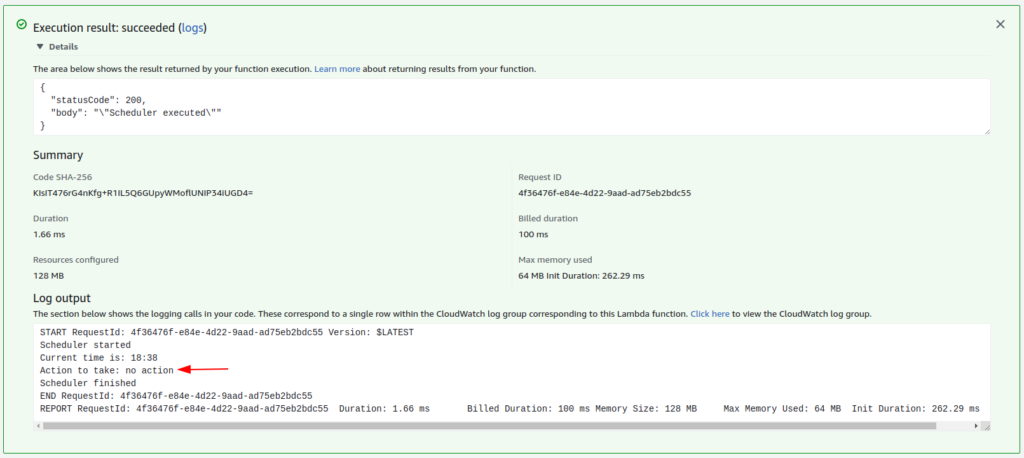
The logs are showing the instances affected by the scheduler and information about steps performed by the script. If something is wrong, logs should be the first thing to look at.
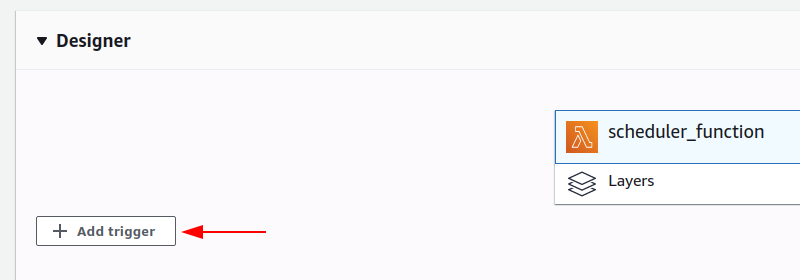
Create trigger to the Lambda function
Now we have to create the trigger that will execute the Lambda function every five minutes. In the upper part of the Lambda function page, you will find the “Add trigger” button:
Fill the trigger definition as shown below and click “Add”:
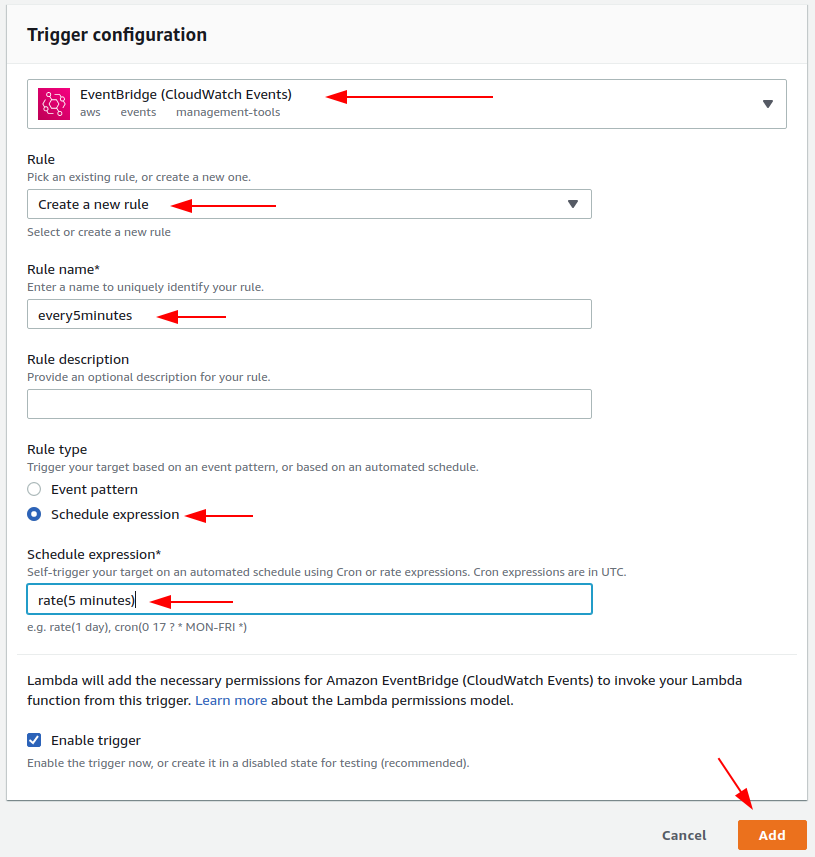
Once the trigger is ready, your function will be executed every five minutes.
With these steps, we achieved the goal – the instance(s) are started or stopped at the scheduled time. You can create multiple functions like this to handle various instances – remember to set proper tags and configure them properly in the Lambda function definition.