AWS Instance Scheduler – quick howto
UPDATE: if you are looking for the easy, custom instance scheduler based on Lambda function, take a look at my other post: Simple AWS EC2 instance scheduler
We’ve got an office server which does not have to be up and running 24/7. It will be good enough if it will start each day at 6 a.m. and will be turned off at 10 p.m. This gives us 2/3 of the day up and running and the remaining 8 hours with no payment for the EC2 instance. You can build scripts to do this on your own – using CLI AWS tools, but you can also use ready-made Instance Scheduler.
Overview – what will be involved
There AWS Instance Scheduler is built on top of various AWS services. CloudWatch is used to trigger Lambda function, Lambda is using DynamoDB as configuration storage, instances are turned on and off by the Lambda function and logs are stored in CloudWatch. There is one additional item – CloudFormation stack which is built from the ready-made Instance Scheduler template. This is why you don’t have to build all scripts on your own – configuration will be the matter of few clicks and adjustments.
Create Instance Scheduler CloudFormation Stack
First, you will have to sign in to your AWS Console. In order to create a new CloudFormation stack from the Scheduler template, you simply need to follow this link. Please note that the region is already selected in this link – if you want to use different region, you can simply switch it in the console navigation bar once the page will be loaded. As you can see, the proper template is already selected so you can simply click Next:

Now you will have to specify details and parameters of your stack. Stack name is simply the name for your stack – I called it OfficeServer-InstanceScheduler. Instance Scheduler tag name is an important one – this tag should be defined for all instances you want to turn on and off automatically. I named it ‘OfficeSchedule’.
Service(s) to schedule – here you can select what types of services should your Scheduler take care of. You can select EC2, RDS or Both. Scheduling enabled – you can decide if the schedule is active or not. Region(s) – if you want to use it only in the current region – leave blank. Default time zone – in our case we wanted to use US/Eastern time zone to make sure that we will not confuse working hours.
Cross-account roles – leave blank if you are not using Scheduler across multiple accounts. This account – I left “Yes” because I will schedule instances only on this account. Frequency – if you are using only full hours to start and stop your instances, you can set to 60 minutes, otherwise, you should select the frequency which fits your periods the best. Memory size – this is memory allocated for the Lambda function, 128 is good enough for small sets of instances. 
Options can be left unchanged if you don’t want to have detailed CloudWatch logs or metrics. Other parameters can also be left unchanged. I used Started tags and Stopped tags because I want to track Scheduler actions on our own for some time. Once you will be ready with all of above, click Next.
CloudFormation stack options and review
On the next page, you will find Options – Tags for your stack, permissions, triggers and advanced additional options. You can leave all of this empty if you don’t have special needs. Once you will click Next you will be presented with Review page – you should review your settings. As the last step with CloudFormation, you will have to confirm that acknowledgment at the bottom of the page. 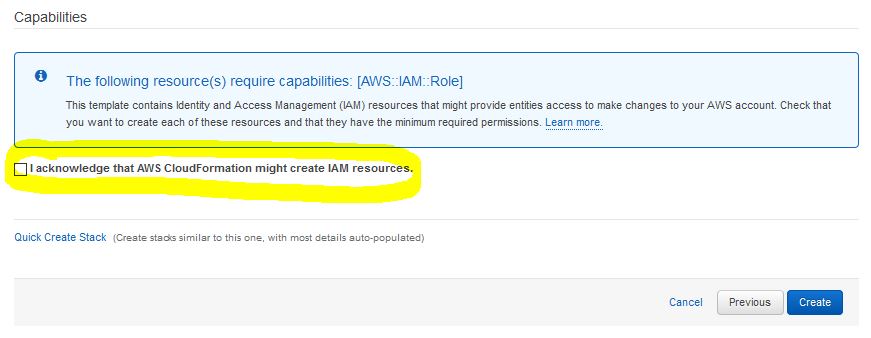
Once you will click “Create” button, you will be done with the most complicated part of the work. Now you will have to wait for the stack to be created. You can switch to the CloudFormation management console and wait till the stack will have the status of CREATE_COMPLETE.
Adjust periods and schedules in DynamoDB
You can switch to the DynamoDB management console. In the Tables, you will find two new items – Config Table and State Table for your Scheduler Lambda function. The State Table should not be changed manually, we will take care of the Config Table. There are three types of entries in this table. Config is handling the main configuration of the Scheduler and most likely you will not need to adjust this. We will take care of the schedule and period type of entries. Initially, there are few example entries created.
Period entries are storing the information about start and end hours. Also, weekdays for given period are stored in the entry. This means that we will need to use only one period record – configured from 6 a.m. to 10 p.m. on weekdays only. Schedule records are defining what time zone given we are working in and what periods are used for the particular schedule. I will use only one period so the configuration will be rather simple.
Because you can not change the names of the records in this table, you will have to copy them and adjust for your needs. The easiest way is to select an item you want to copy and click Actions -> Duplicate. You can now change hours and days to fit your needs. You should choose proper name for your period – it will be used in the schedule. I named it ‘canada-office-hours‘.
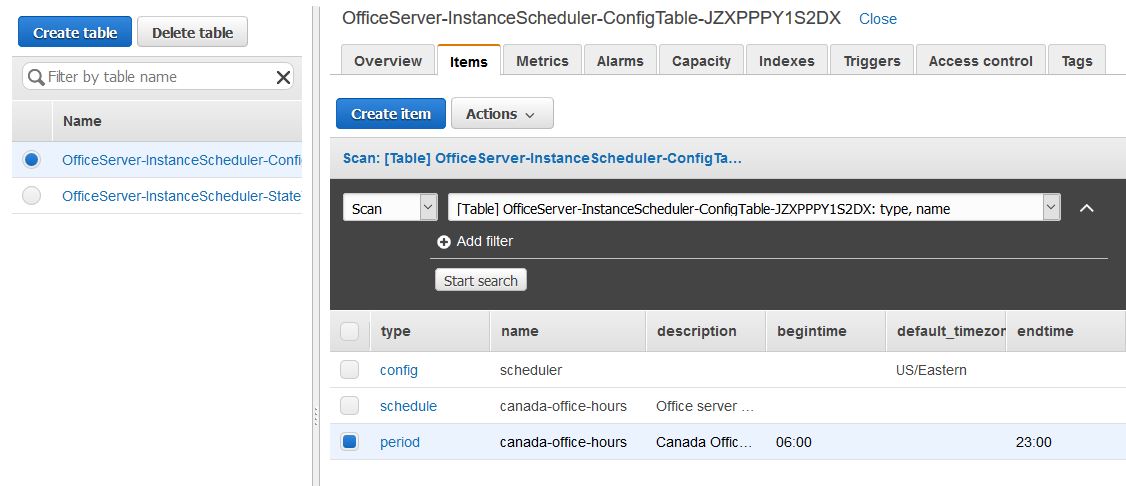
The same you can do with schedule record – duplicate and adjust as per your needs. Please note that you should place proper period name in periods list – in my case ‘canada-office-hours‘. You should also set proper name for your schedule record – it will be used in tags of the instances you want to automate. I also named it ‘canada-office-hours‘.
 We are almost done, let’s take care of the instances.
Instance tagging
Now it is time to let the Scheduler know which instances should be turned on and off. Remember, in the CloudFormation configuration I used ‘OfficeSchedule‘ in the Instance Scheduler tag configuration. This is the tag we will use for our instances. Let’s switch to the EC2 management console, select the proper instance and click Add/Edit Tags in the Tags tab. I simply added the tag named ‘OfficeSchedule‘ with the value of ‘canada-office-hours‘ – the name of the schedule record from the DynamoDB. That’s all. Lambda function is executed every 60 minutes (or every nn minutes as configured) and is matching EC2 instance tag with the records in the DynamoDB. The instance is started and stopped on selected hours automatically.
Additional notes
You should be aware that you will be charged for the DynamoDB usage, Lambda usage, and CloudWatch metrics if you decided to use them. The charges are not big but you are warned. Savings from the hours when the instance is not working should be much bigger.
The second thing you should bear in mind – you can still turn your instance on and off manually. If you will turn your instance on before the scheduled start time, it will stay turned on, the scheduler will do nothing. Also if you will turn your instance off before the scheduled time, it will remain off. On the other hand, if your instance is turned on and you are working on it, the scheduler will turn it off at the scheduled time no matter what – it is not monitoring instance usage. I warned you 🙂
Hi,
I have an issue with the scheduler.
I want only to stop all instances at 18:30 (don’t need begintime) and let the users start instances. How should I do it?
Thanks
I will try to explain this in few words. The scheduler is driven by the Lambda function created during the setup phase by Cloud Formation. One of the ways you can change its behavior is to alter the lambda function. In my example, when I went to Lambda console, I found that this function contains various files. In the “schedulers” directory, I found “instance_scheduler.py” file. In the line #488 I found the IF statement “if len(self._scheduler_start_list) > 0:” – you can simply comment out the whole IF statement from this line to the next IF – this way you will remove starting function, leaving stopping function in place.
I have a similar need, but do want to schedule some servers to use both a start and stop time. I’m not having any luck with consistent results using various combinations of override_status, enforced, removing begintimes, using multiple periods in a day, etc. Any suggestions on how to use the AWS Instance Schedulers parameters/framework to only stop instances?
I’m not sure how good are you in programming. The easy way I can give you is to add a flag to the configuration of given server (to add it into DynamoDB record) which will store the information if the server should be only started, only stopped or act as usual (start and stop). For example, for no flag, the lambda function will work as usual (start and stop), for “StartOnly” value stored in this flag, you will modify the lambda function to skip the stop action, and for “StopOnly” value you will modify the lambda function to skip start action. Is this something you are able to achieve on your own?
Hi there !
Thanks for this good howto, I was stuck with AWS documentation…not so straight forward.
I’m in a similar situation than William here, and I was thinking to just configure my DymanoDB table with stopping time and no beginning time. Whoudn’t be easier ? Need to test though !
Cheers,
K.
Yes, you should definitely test. As far as I can tell, if you will configure only stop time, it should work if you will start your instance manually. Please note one thing: if you will set your stop time to 4 PM and you will start your instance the same day, after 4 PM, it will be stopped once the Lambda will be executed (in 5 minutes or whatever time you will configure).
hey dulare,
It’s working like a charm 🙂
And thanks for the heads up, so Lamda function can only run each 5mins? I guess this is a product feature and you can’t change that…
Cheers,
K.
As far as I know, if you are using CloudWatch Events (this is what is configured by default for scheduler) you can go down even to 1 execution per minute when talking of Lambda Functions. This should be enough for a scheduler 🙂 – I am using 15 minutes as the interval for scheduler Lambda functions.
On the other hand, you can use Lambda functions for other tasks. They can be triggered (for example) by uploading files to S3 or DynamoDB updates. In such case, Lambda can reach hundreds or thousands of executions per minute – depending on the frequency of events.
I truly appreciate your post! I read all of the AWS documentation and spent a few hours making little progress. Your quick how-to was just the right info to get everything up and running! Thank you for your good explanations… not sure why Amazon couldn’t break it down like this.
Thank you for your comment. There is an even easier way to handle automated start and stop of AWS instances, but this involves Lambda development from scratch. Once I will find some time, I will write an additional post in this matter 🙂
Hi Handyman,
Good Blog! very very handy. Like Dulare said, The AWS doco is vague and confusing. Like to see more Blogs from you. Also, easier way to handle automated script would be appreciated.
Thanks
AJ
I’ve used your guide, but it doesn’t seem to be working. When I check my instances at the time they should be stopped they’re still running, if I stop an instance manually and check at the time they should be running they’re still stopped. Any idea why this may be happening or how I can troubleshoot?
There are a dozen reasons for such behavior. If I were you, I would start by checking the logs of the Lambda function which is taking care of this process. Go to the administrative console, and switch to Services -> Lambda. Find the function which is taking care of the scheduler. Once there, you should see two tabs in the top left section of the page. You should have Configuration selected so you should click on Monitoring. On the monitoring page, you should be able to see if the function was executed – there is a chart showing the number of executions per hour (or per other periods of time). If the function is executed properly, click on “View logs in CloudWatch” button. CloudWatch should open in new tab and you should see the logs. Take a look if there are any errors in your logs.
In the default log, the amount of information is limited. You will see only when the request started and ended and statistics of consumed memory and time. There should be no errors there. The default log I’m talking of is the log which is visible under the breadcrumb of “CloudWatch > Log Groups > /aws/lambda/NAME_OF_YOUR_FUNCTION”. Let’s now take a look at the detailed log. Click on the “Logs” menu on the left-hand side of the page. You should see the list of logs you have access to. You should see two which are related to the lambda function we are talking of. One set of logs is named “/aws/lambda/NAME_OF_YOUR_FUNCTION” and we already reviewed this one. The second one is named “NAME_OF_YOUR_FUNCTION” – click on this one.
You should see a list of entries in the log. Find the latest “InstanceScheduler” entry (the newest one) and click on it. You should see the long list of entries. You can expand each of these entries by clicking on the triangle on the left of given entry. Inside you should find detailed debugging information including the information about the events (run, stop), tag name of the instances that are taken into consideration, schedulers used in given request and so on. These are provided in JSON format and should be easy to read. You should now review if there are clear errors you can spot – maybe you made a typo in the instance tag (case sensitive?), maybe there is something wrong with hours being scheduled… It’s hard to tell seeing no logs.
Hello,
Great blog here. The scheduling works perfectly for me except for a use case I have to turn off the instances during weekends, and I’m not really sure how to do it. Can you recommend some configurations of schedule and period in DynamoDB?
Let me prepare the answer and I will get back to you 🙂
Danilo,
In the Dynamo Database, there are config tables. There is an item named “schedule” which is pointing to the proper “period” that is in use. In my case it is named “canada-office-hours” – this is the period I’m using. In your case, the period can be named differently. Once you will find the proper period, you should edit this particular period you are using. In my case, there is a field in this period record, which is named “weekdays”. I’m using “mon-sun” because I’m using the same period during the whole week. In your case, you should change it to “mon-fri”. This should be the easiest solution for your needs.
Hello,
Really great great blog here, very handy indeed.
I just tried to do this except for the timezone, I used Asia/Singapore and SG-Office-Hours, everything is the same (OfficeSchedule).
I set the time the begintime to 18:15 (which is 6:15 pm) and endtime to 18:45 (which is 6:45pm). I double checked the tags on my instance and it is correct.
But it did not started. Anything I can check ? Did anyone here just tried US eastern? What if I’m on ASIA, will this really not work?
As I wrote in one of the comments above, you should start by reviewing CloudWatch logs for the Lambda function which is responsible for the scheduler. It should give you the information on what is going on (if there are any instances found by the function, what is the state and so on). Check the logs 😉
Hi,
Thanks for the really quick quick feedback, I’ll try to check it revert back the soonest.. The documentation from AWS is kinda daunting in a way that it was not properly explained to use tags “in a simple manner”.
Regards,
Steven
Hi,
I adjusted it to 18:45 (6:45PM) but still, the instance did not start-up, not sure if I shall re-do the whole lab? I checked the logs you are pertaining to and it returns code 200 which means good right?
See the image on the link below if this can help 🙂
https://imgur.com/a/rZ44jiR
Regards,
Steven
Hello,
By the way, when you first did this lab (using your procedures) did you specify anything on IAM or on SNS ? I’m just wondering maybe it’s on either side but then again, logs shows error code 200…
I’ll try to get back to you as soon as I can.
Regards,
Steven
Hello Steven,
It looks like you reviewed only part of the logs. The main log of the function. There is the second one. Please take a look at my comment above once again and review the proper log. In this detailed log, the lambda function is giving you more information that can be useful in your case.
When talking of IAM and SNS, everything should be configured automatically by CloudFormation when creating the configuration. I have never had a problem with this part.
Once again – review all lambda logs, not only the main log.
Hello,
Yup, saw the logs you’re mentioning, it states that it saw zero instances with that tag..I’ll redo cloudformation stack creation, I’ll set lambda frequency to 5 minutes (what does that mean by the way). I ensured that the tags are correct though.. I attached 3 images, nevertheless, I’ll re-try now.. Just to confirm, we are using military time right? If it’s 12 PM here, then it will be 12:00 – 13:00 (1pm)..
Images via imgur:
DynamoDB: https://imgur.com/a/D8FPQmP
EC2: https://imgur.com/a/Y2SV2Uf
Lambda Log: https://imgur.com/a/XbDe0q5
I know I’m near towards the solution 🙂
Regards,
Steven
UPDATE
Hello again,
Alright, I figured out the issue earlier is that on the stack creation, I just named the tag as “Schedule” and changed it to my DynamoDB explicitly as “OfficeSchedule”, thus, shows zero result, I think you cannot change the column name on DynamoDB that way… moving forward, I re-created the stack and this time, PROPERLY… So yay, finally, the logs is showing that it was able to fetch my 2 EC2 instances with Tag: OfficeSchedule MNL-Office-Hours
The spelling was correct on DynamoDB name definition and on my ec2 instance tag (I followed your procedures in creating a new period on DynamoDB). Okay, logs shows that both instances has been seen and on State “2” because it is STOPPED, I’m not sure how to translate the logs, but here it goes..
I’m wondering if I’ll just re-create instances just for the sake of the tag?
Link: https://imgur.com/a/w3sfnnz
Kind Regards,
Steven
Hello Steven
What I can tell from your screenshots is: you have period named MNL-Office-Hours but you have no Schedule named MNL-Office-Hours and this is why it is not working. I know that this is a little bit confusing, but you should know the dependencies in here. Right now you have your Instances configured properly because the Lambda function is able to find them properly. But the function is not able to find a proper schedule (schedule named MNL-Office-Hours). Please take a look at my configuration at the attached screenshot:
DynamoDB configuration of schedule and period
As you can see, I have the schedule which is named canada-office-hours and I have the period named the same. My schedule is configured to use this particular period. This is the method you should use in your case.
Side note – do not recreate your instances. This has nothing to do. Also – you can always remove, edit, add tags, no need to recreate the instance to perform such simple tasks.
Because I addressed other questions in my other comments, I will only add one thing to this comment: Lambda frequency – this is the frequency in which your schedule will execute Lambda function and this means that every 5 minutes Lambda will check if the instances are running, stopped and if they should be started or stopped. If you don’t need to have your EC2 instances started at the particular time down to the minute, you can use 5 minutes or even less (15 minutes for example).
Hello,
Thank you so much for the constructive feedback and taking time to do it on your own, yes, that’s the thing I didn’t understood, creating a schedule vs having a “period” set-up..
I tried to do it now and I’m just waiting for it to trigger..
I’ll get back shortly
Hello,
Okay, I’m not sure how to thank you for being wonderful to check and to reply to my queries, but it DID WORK, finally 🙂
Thank you so much, I’ll keep this blog for reference and recommend this to the forums I’m into..
Again, thanks so much, it worked 🙂
Regards,
Steven
I’m glad that it worked 🙂
Hello,
I just have a question regarding the set-up of cross-account access. First things first, I set-up everything under my own account and then used the remote template to my other account and referenced the primary account number. The thing is, it is not working, now I checked back the FAQ and saw that I need to re-set up everything and fill out the Cross-Account Roles.
Cross-account roles
Comma-delimited list of cross-account roles. For example, arn:aws:iam::111122223333:role/SchedulerCrossAccountRole.
Note
Enter the secondary account CrossAccountRoleArn value(s) in this parameter.
What I don’t understand is the example itself, what should I create and what roles should I map? Do I need to create new role? Please let us know 🙂
Kind Regards,
Steven
Quick follow-up
Do I need to launch the instance-scheduler-REMOTE template on the secondary account first before doing the stack creation on the primary account? I’m really confused about the Cross-account roles (based from the documentation) lol.
Regards,
Stevem
Steven,
I have never had an opportunity to configure cross-account access, once I will find some time, I can try to investigate. This can take a while, so you have to be patient or try to figure it out on your own and let us know how you did it 🙂
Hi,
I was able to do it 🙂 thanks for the prompt response.
Still the same set-up, set the parameter on the stack “This Account” to YES, but on the Cross-Account Roles, use the ARN of the IAM ROLE created on the other account.
In order to get the ARN of the IAM Role on the other account, use the remote instance template from AWS for instance scheduler, it will just create the cloudformation stack and will just create a role, that’s it 🙂
Regards,
Great to hear! Thank you for the comment with instructions 🙂
Is there a way to ensure an instance is stopped, regardless of what state it’s in and overriding manual state changes?
Our use case for this is stopping a test server in the evening, after everyone will have finished working on it. This server may or may not be needed on any given day, so starting it up must be manual, but we want to ensure it is stopped, after work, without relying on the users to remember.
In my comment on 2018-05-15 above (link) I explained how you can achieve such behavior by modifying the Lambda function. You can simply comment out the part which is starting the server, leaving the part which is stopping it. This way the function will take care only of stopping the instance.
Hello Handyman
Thanks a lot for this quick guide
I have a question about this AWS Instance Scheduler
Can I use RDS to store Instance Scheduler config?
Unfortunately, the default configuration of AWS Instance Scheduler is not configured to work with RDS – all data structures are optimized for DynamoDB. However, if you have some knowledge of Python, you can change it to work with RDS. I have no ready-made solution, but this is possible.
Hi There,
Instance Scheduler is stopping my instance just fine but it is not turning it up.
My Requirement is to stop the instance at 20:00PM ( EU Time) and Start the Instance at 7:00AM ( EU Time) from Monday to Friday.
It is stopping the instance at 20:00 but not turning it up at 7:00. I have written only one Period and Schedule, And in the schedule I have mentioned the period.
Can you please help here?
Karan, please review the comments above – there is information on how to review logs of the scheduler. Most likely you will find the answer to your question in the logs – there is something wrong with the configuration.
This is probably the best documentation of the AWS Instance Scheduler. The official documentation was confusing. I fould a coupe of youtube videos that were good but this is probably the best. It did help clarify quite a few things.
I still have a couple of questions though, my requirement like many others here is to stop the instance (RDS in mycase) at a fixed time and have the oppurtunity to start it whenever I want. You have recommended commenting a particular line in the py code, my question is if its not possible to achieve the same using the override_status being set to ‘stopped’ in my Schedule. Was this not the purpose of ‘override_status’. I have not been able to get this to work at all.
Another questions is that the article at https://github.com/awslabs/aws-instance-scheduler/issues/32 seems to mentuon changing the values in the template directly. How does that work
Hello Ranga,
When talking of “override_status” – it looks like you should use “OverrideStatus” instead (change the case, remove underscore). Give it a try and let me know what you found.
Changing the values in the template means that during the next installation of the instance scheduler (the installation is made from the template) these changed values will be used. In other words, by changing the template directly, you will change the source code of the scheduler. The template is used to create a new scheduler.
I had previously tried using OverrideStatus as the key in the dynamodb table for a schedule and it did not work. Using override_status works for some scenarios but not all. In by case I want the RDS to be started manually but want it to stop at a particular time. SO I have tried specifying override_status = stopped and also specifying a particular begintime (hoping it will be ignored) as well as not giving the begintime entry, I then started the instance manually but the instance did not stop at the time mentioned in endtime. I will try a couple of other options and will update if I can get this to work. Thanks
Thank you for the update, this is very useful. I guess that you reviewed logs stored in the CloudWatch? Maybe you will find useful information in there.
Reading your articles, other articles and analyzing the logs I realized that I should not bee looking at override_status for my usecase. Since I only wanted to have a specific time but have the option of starting whenever I choose, I have to have a period with no begintime set but only a endtime and not have the override_status set at all. This does the job. It seems like override_status is set at one off occasions when you ignore all periods and stop instances, that was not my usecase though. Unfortunately the documentation was not clear about this for me.
@dulare, your writeup on the logs to look into were very helpful, thanks.
Thanks you, Dulare. It’s very helpful.
Very helpful post for getting AWS’ Instance Scheduler running. Reading the official documentation is time consuming and doesn’t provide clear simple examples. Cheers
Hello,
Very good HowTo!
I am struggling to apply multiple periods to a schedule in dynamoDB… I tried different syntaxes (coma, semicolon separated etc) but it still not working if i have more then one period assign to a schedule. For instance i would like to have a period “office-hours” for the classic working hours during the week, and another period for the week end maintenance.
I just want to show my appreciation for this article.
It was very helpful for me. It is concise, well described and complete how to.
Thank you very much.
Thank you 🙂
Can this solution be run for instances within a VPC ?
Yes, it is working on the intances within a VPC, but as you probably noticed each instance has to be properly tagged.
Hi Dulare!
How can I set the scheduler that will only stop the instances during weekends?
without turn them on after weekends.
It means, I want every weekend to stop the running instances. Not care about start them.
Thanks!!
Please take a look at the first comments on this post. You can schedule the actions for the particular days and you can comment out the “start” related functions. On the other hand, if I were you, I would probably create a simple crontab job to shut the instances down. It can be way easier than configuring AWS Instance Scheduler.
Thanks Dulare!
I want to stop the instances only in weekends. What should I set in the dynamoDB table?
The instances should be stopped only in weekends.
Thanks again.
If you want the scheduler to act only on weekends, set the “weekdays” value to “sat-sun”. This is stored in your “period” record in the DynamoDB table.
When I set it like you said, the scheduler turn off my instances every time except “sat-sun”
I want in weekdays (mon-fri) that nothing will happen to the instances.
Thanks!
Hi,
I’m trying to create schedule for always OFF, any trick to trick the begintime and endtime?
Hello Mickey,
It looks like I tried to answer such a need in one of the comments above, please take a look here: https://handyman.dulare.com/aws-instance-scheduler-quick-howto/#comment-3
I’m also about to publish the new version of this post. I simply wrote a lambda function on my own to do the same much easier way (from my point of view). Stay tuned 🙂
Dulare
how can we use multiple tags?
eg .
environment – 1 and hours – 9×5
environment – env2 and hours – 10×6
You can declare multiple periods. In my example, I’m using only one period, but you can declare more periods – in your example two of them. Once you will have two periods configured (and named) you can use the names of these periods in the instance tags. In my example, the tag name is OfficeSchedule and the contents of this tag are pointing to the period that should be used. So, for one of your instances, you should set the name of your first period, in the other instance – the name of your second period. Summarizing:
1) Set two periods:
– env1 with hours 9-5
– env2 with hours 10-6
2) When tagging instances set the tag contents to “env1” for the first environment, “env2” for the second environment.
Hi Dulare,
Awesome post. Just started learning about the instance scheduler. I am not very great with programming, but was trying to figure out a way to alter the lambda function to include a second tag. So i want the scheduler to be able to use 2 tags, and not just 1 by default. Any ideas that can point me to the right direction?
Regards
Hello Clive,
The instance scheduler provided by AWS works only with a single tag out of the box. You can, however, adjust the Lambda function to look for more. I was never trying to handle this, instead I wrote the simpler scheduler, to address my simple needs. It is described in the second post: Simple AWS EC2 instance scheduler – if you will want to use multiple tags, you will need to adjust “custom_filter” which is defined in line 73 and provide a second tag to check.
Dulare