ESP8266 + DS18B20 + web server
I have a bunch of DS18B20 sensors in my ventilation system. The measurements are used to generate stats and to adjust the heating. From my point of view, it is good to have a web server which is taking care of the data manipulation.
If you are interested in general Client-Server communication and web page generation using ESP8266 take a look at my older post: Client-server communication using ESP8266
The problem
I want to have all my temperature readings from DS18B20 in one place. This place is my remote server running database and website. For me, the easiest way to handle this was to use ESP8266 and send the data over WiFi.
Arduino IDE preparation
For the ease of programming and general ease of use, I decided to use NodeMCU instead of bare ESP8266. This way I can use Arduino IDE to compile and upload my sketches to the board.
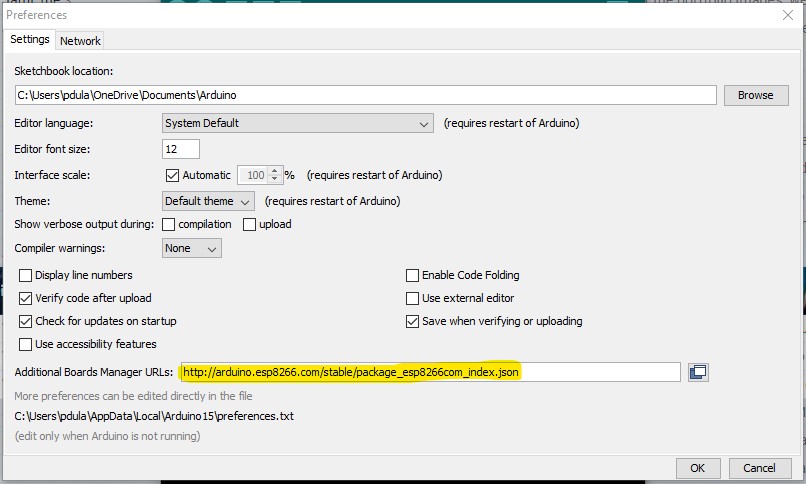
The Arduino IDE needs to be configured for NodeMCU and ESP8266. Go to File -> Preferences and paste http://arduino.esp8266.com/stable/package_esp8266com_index.json in the Additional Boards Manager URLs field:

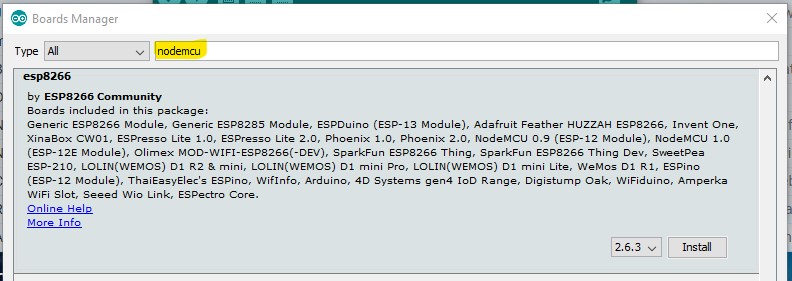
Once saved, go to Tools -> Board […] -> Boards Manager and enter NodeMCE in the search field, select the latest version and install.

Once installed, you can select your version of the NodeMCU board from the Tools -> Board […] menu.
Libraries
In order to work with the DS18B20 and WiFi, I installed libraries for OneWire communication protocol and Dallas Temperature sensors (DS18B20). In the Arduino IDE, you can install them by selecting the “Tools” menu and clicking on the Manage Libraries submenu.
For the first library, OneWire communication protocol, enter “onewire” in the search box and select the one that is developed by Jim Studt, Tom Pollard, and others. Select the latest version and click Install.

For the Dallas Temperature, in the search field enter “dallas temperature” and select the one that is developed by Miles Burton and others. Select the latest version and click Install.

How will my program work?
Once the board is powered on, I want it to obtain WiFi connection and to check for available temperature sensors. This is performed in the setup function which is executed once at the very beginning.
On the contrary, the loop function is executed over and over again “forever”. You can break the cycle by turning off the power or by pressing reset button on the board. In my loop function, I want the board to read the temperature from the sensors and send these readings to the server. After each cycle of reading and sending, I want the board to wait for some time before continuing.
Step by step – initial setup
At the very beginning there are libraries loaded and variables created:
#include <OneWire.h>
#include <DallasTemperature.h>
#include <ESP8266WiFi.h>

// WiFi setup
const char* ssid = "SSID_of_the_network";
const char* password = "wifi_password";

// Receiver server setup
const char* receiverHost = "receiver.server.com";
const int httpGetPort = 80;
String receiverURL = "/receive.php";

// Data wire is plugged TO GPIO 4
#define ONE_WIRE_BUS 4

// Setup a oneWire instance to communicate with any OneWire devices
OneWire oneWire(ONE_WIRE_BUS);
DallasTemperature sensors(&oneWire);

// Number of devices found
int numberOfDevices;

// Device addresses storage
DeviceAddress tempDeviceAddress;
You should fill the WiFi related information (Update on 2021-02-17: check my new post on WiFi Manager for easy network management) and the information about the server. The script is prepared to send temperature readings to the server using GET calls. If your server is working under http://yourDomain.com/yourReceiverURL/ you should feel receiverHost with yourDomain.com and receiverURL with /yourReceiverURL/.
The setup function will take care of the WiFi connection and OneWire device detection:
void setup() {
  Serial.begin(115200);

  // Start up the library, grap a count of devices
  sensors.begin();
  numberOfDevices = sensors.getDeviceCount();

  // Loop through each device, print out address
  for(int i=0;i<numberOfDevices; i++){
    // Search the wire for address
    if(sensors.getAddress(tempDeviceAddress, i)){
      Serial.print("Found device ");
      Serial.print(i, DEC);
      Serial.print(" with address: ");
      printAddress(tempDeviceAddress);
      Serial.println();
    } else {
      Serial.print("Found ghost device at ");
      Serial.print(i, DEC);
      Serial.print(" but could not detect address. Check power and cabling");
    }
  }

  // WIFI configuration
  delay(10);
  WiFi.hostname("ESPboard-temperature-receiver");
  WiFi.begin(ssid, password); // Connect to the network
  Serial.print("Connecting to ");
  Serial.print(ssid); Serial.println(" ...");

  int i = 0;
  while (WiFi.status() != WL_CONNECTED) {
    // Wait for the Wi-Fi to connect
    delay(1000);
    Serial.print(++i); Serial.print('.');
  }

  Serial.println('\n');
  Serial.println("Connection established!");
  Serial.print("IP address:\t");
  Serial.println(WiFi.localIP());
}
There are various debug information provided by Serial connection so you can review them in Arduino IDE while testing your solution. Once you will have your solution working fine, you can get rid of them. On the other hand, they do no harm to the board nor to the code so you can leave them for future use.
Utility functions
There are three utility functions, two small ones:
// print device address in human readable form
void printAddress(DeviceAddress deviceAddress) {
  for (uint8_t i = 0; i < 8; i++){
    if (deviceAddress[i] < 16) Serial.print("0");
      Serial.print(deviceAddress[i], HEX);
  }
}

// convert device address to string
String convertAddressToString(DeviceAddress deviceAddress) {
  String addrToReturn = "";
  for (uint8_t i = 0; i < 8; i++){
    if (deviceAddress[i] < 16) addrToReturn += "0";
    addrToReturn += String(deviceAddress[i], HEX);
  }
  return addrToReturn;
}
The first one is printing an address of the device as a readable HEX string – it is also used when sending data to the server instead of the raw numeric value. The second one is converting an address to the string and returning the string instead of printing it.
Sending the data to the server
The main part of the program is the function which is taking care of actual data sending:
// send data to the receiver host
void postData() {
  WiFiClient clientGet;
  // create URL and set parameters
  String src = "ESP";
  String getReceiverURLtemp = receiverURL + "?src=" + src;

  // Send the command to get temperatures
  sensors.requestTemperatures();

  // Loop through each device, collect temperature data
  for(int i=0;i<numberOfDevices; i++){
    // Search the wire for address
    if(sensors.getAddress(tempDeviceAddress, i)){
      float tempC = sensors.getTempC(tempDeviceAddress);
      getReceiverURLtemp = getReceiverURLtemp + "&d" + i + "=" + convertAddressToString(tempDeviceAddress) + "&d" + i + "t=" + tempC;
      Serial.println(getReceiverURLtemp);
    }
  }

  Serial.println("-------------------------------");
  Serial.print(">>> Connecting to host");

  if (!clientGet.connect(receiverHost, httpGetPort)) {
    Serial.print("Connection failed");
  } else {
    clientGet.println("GET " + getReceiverURLtemp + " HTTP/1.1");
    clientGet.print("Host: ");
    clientGet.println(receiverHost);
    clientGet.println("User-Agent: ESP8266/1.0");
    clientGet.println("Connection: close\r\n\r\n");

    unsigned long timeoutP = millis();
    while (clientGet.available() == 0) {
      if (millis() - timeoutP > 10000) {
        Serial.print(">>> Client Timeout");
        clientGet.stop();
        return;
      }
    }

    // check the first line of the response, just in case
    while(clientGet.available()){
      String retLine = clientGet.readStringUntil('\r');
      Serial.print(">>> Host returned: ");
      Serial.println(retLine);

      if (retLine == "HTTP/1.1 200 OK") {
        Serial.println(">>> Communication successful");
      } else {
        Serial.println(">>> Communication failed!!!");
      }
      break;
    }
  }

  Serial.print(">>> Closing host");
  clientGet.stop();
}
The function is creating a connection to the server, collects the temperature measurements and sends them all along with the device addresses in GET string (in the URL of the request).
The sample URL looks like this:
/receive.php?src=ESPTemperature&d0=10f4269c0108001f&d0t=2.87&d1=10a5049c0108007d&d1t=21.19
There is source information followed by the address and temperature of each sensor. The d0 variable and d1 variable are handling addresses, d0t and d1t are handling temperature readings in Celcius.
The main loop
Last but not least, the main loop function:
void loop() {
  sensors.requestTemperatures(); // Send the command to get temperatures

  // Loop through each device, print out temperature data
  for(int i=0;i<numberOfDevices; i++){
    // Search the wire for address
    if(sensors.getAddress(tempDeviceAddress, i)){
      // Output the device ID
      Serial.print("Temperature for device: ");
      Serial.println(convertAddressToString(tempDeviceAddress));
      // Print the data
      float tempC = sensors.getTempC(tempDeviceAddress);
      Serial.print("Temp C: ");
      Serial.println(tempC);
    }
  }
  postData();
  delay(60*1000);
}
In my case, the function is reading temperatures, sends them through the serial port for debug purposes and later calls the postData function which is taking care of the server communication. It is also configured to wait one second in each cycle. Of course, you can get rid of the debugging code, leaving the function in minimal form:
void loop() {
  postData();
  delay(60*1000);
}
I strongly recommend leaving the serial communication in place. From time to time there is a need to check what is going on with the board and it is much easier to do if you have your debug code in place.
The whole program
Below you can review the whole program in one piece. Even today when I’m looking at the code I’m able to find things that should be adjusted, but it is working as is. Most likely I will spend some time adjusting it in the future and I will post the update once adjusted.
#include <OneWire.h>
#include <DallasTemperature.h>
#include <ESP8266WiFi.h>

// WiFi setup
const char* ssid = "SSID_of_the_network";
const char* password = "wifi_password";

// Receiver server setup
const char* receiverHost = "receiver.server.com";
const int httpGetPort = 80;
String receiverURL = "/receive.php";

// Data wire is plugged TO GPIO 4
#define ONE_WIRE_BUS 4

// Setup a oneWire instance to communicate with any OneWire devices
OneWire oneWire(ONE_WIRE_BUS);
DallasTemperature sensors(&oneWire);

// Number of devices found
int numberOfDevices;

// Device addresses storage
DeviceAddress tempDeviceAddress;

void setup() {
  Serial.begin(115200);

  // Start up the library, grap a count of devices
  sensors.begin();
  numberOfDevices = sensors.getDeviceCount();

  // Loop through each device, print out address
  for(int i=0;i<numberOfDevices; i++){
    // Search the wire for address
    if(sensors.getAddress(tempDeviceAddress, i)){
      Serial.print("Found device ");
      Serial.print(i, DEC);
      Serial.print(" with address: ");
      printAddress(tempDeviceAddress);
      Serial.println();
    } else {
      Serial.print("Found ghost device at ");
      Serial.print(i, DEC);
      Serial.print(" but could not detect address. Check power and cabling");
    }
  }

  // WIFI configuration
  delay(10);
  WiFi.hostname("ESPboard-temperature-receiver");
  WiFi.begin(ssid, password); // Connect to the network
  Serial.print("Connecting to ");
  Serial.print(ssid); Serial.println(" ...");

  int i = 0;
  while (WiFi.status() != WL_CONNECTED) {
    // Wait for the Wi-Fi to connect
    delay(1000);
    Serial.print(++i); Serial.print('.');
  }

  Serial.println('\n');
  Serial.println("Connection established!");
  Serial.print("IP address:\t");
  Serial.println(WiFi.localIP());
}

// print device address in human readable form
void printAddress(DeviceAddress deviceAddress) {
  for (uint8_t i = 0; i < 8; i++){
    if (deviceAddress[i] < 16) Serial.print("0");
      Serial.print(deviceAddress[i], HEX);
  }
}

// convert device address to string
String convertAddressToString(DeviceAddress deviceAddress) {
  String addrToReturn = "";
  for (uint8_t i = 0; i < 8; i++){
    if (deviceAddress[i] < 16) addrToReturn += "0";
    addrToReturn += String(deviceAddress[i], HEX);
  }
  return addrToReturn;
}

// send data to the receiver host
void postData() {
  WiFiClient clientGet;
  // create URL and set parameters
  String src = "ESP";
  String getReceiverURLtemp = receiverURL + "?src=" + src;

  // Send the command to get temperatures
  sensors.requestTemperatures();

  // Loop through each device, collect temperature data
  for(int i=0;i<numberOfDevices; i++){
    // Search the wire for address
    if(sensors.getAddress(tempDeviceAddress, i)){
      float tempC = sensors.getTempC(tempDeviceAddress);
      getReceiverURLtemp = getReceiverURLtemp + "&d" + i + "=" + convertAddressToString(tempDeviceAddress) + "&d" + i + "t=" + tempC;
      Serial.println(getReceiverURLtemp);
    }
  }

  Serial.println("-------------------------------");
  Serial.print(">>> Connecting to host");

  if (!clientGet.connect(receiverHost, httpGetPort)) {
    Serial.print("Connection failed");
  } else {
    clientGet.println("GET " + getReceiverURLtemp + " HTTP/1.1");
    clientGet.print("Host: ");
    clientGet.println(receiverHost);
    clientGet.println("User-Agent: ESP8266/1.0");
    clientGet.println("Connection: close\r\n\r\n");

    unsigned long timeoutP = millis();
    while (clientGet.available() == 0) {
      if (millis() - timeoutP > 10000) {
        Serial.print(">>> Client Timeout");
        clientGet.stop();
        return;
      }
    }

    // check the first line of the response, just in case
    while(clientGet.available()){
      String retLine = clientGet.readStringUntil('\r');
      Serial.print(">>> Host returned: ");
      Serial.println(retLine);

      if (retLine == "HTTP/1.1 200 OK") {
        Serial.println(">>> Communication successful");
      } else {
        Serial.println(">>> Communication failed!!!");
      }
      break;
    }
  }

  Serial.print(">>> Closing host");
  clientGet.stop();
}


void loop() {
  sensors.requestTemperatures(); // Send the command to get temperatures

  // Loop through each device, print out temperature data
  for(int i=0;i<numberOfDevices; i++){
    // Search the wire for address
    if(sensors.getAddress(tempDeviceAddress, i)){
      // Output the device ID
      Serial.print("Temperature for device: ");
      Serial.println(convertAddressToString(tempDeviceAddress));
      // Print the data
      float tempC = sensors.getTempC(tempDeviceAddress);
      Serial.print("Temp C: ");
      Serial.println(tempC);
    }
  }
  postData();
  delay(60*1000);
}